How To Add Quantity to Your Shopify Product Page

It may not seem significant, but adding Quantity to your Shopify Product Page can go a long way in terms of customer engagement. Whether you're selling t-shirts, supplements, or handmade candles, giving shoppers the ability to select how many items they want, quickly and intuitively, can improve the user experience and boost your average order value. In this guide, we’ll walk you through multiple ways to add and optimize a quantity selector, from no-code options to custom coding.
What is Product Quantity?
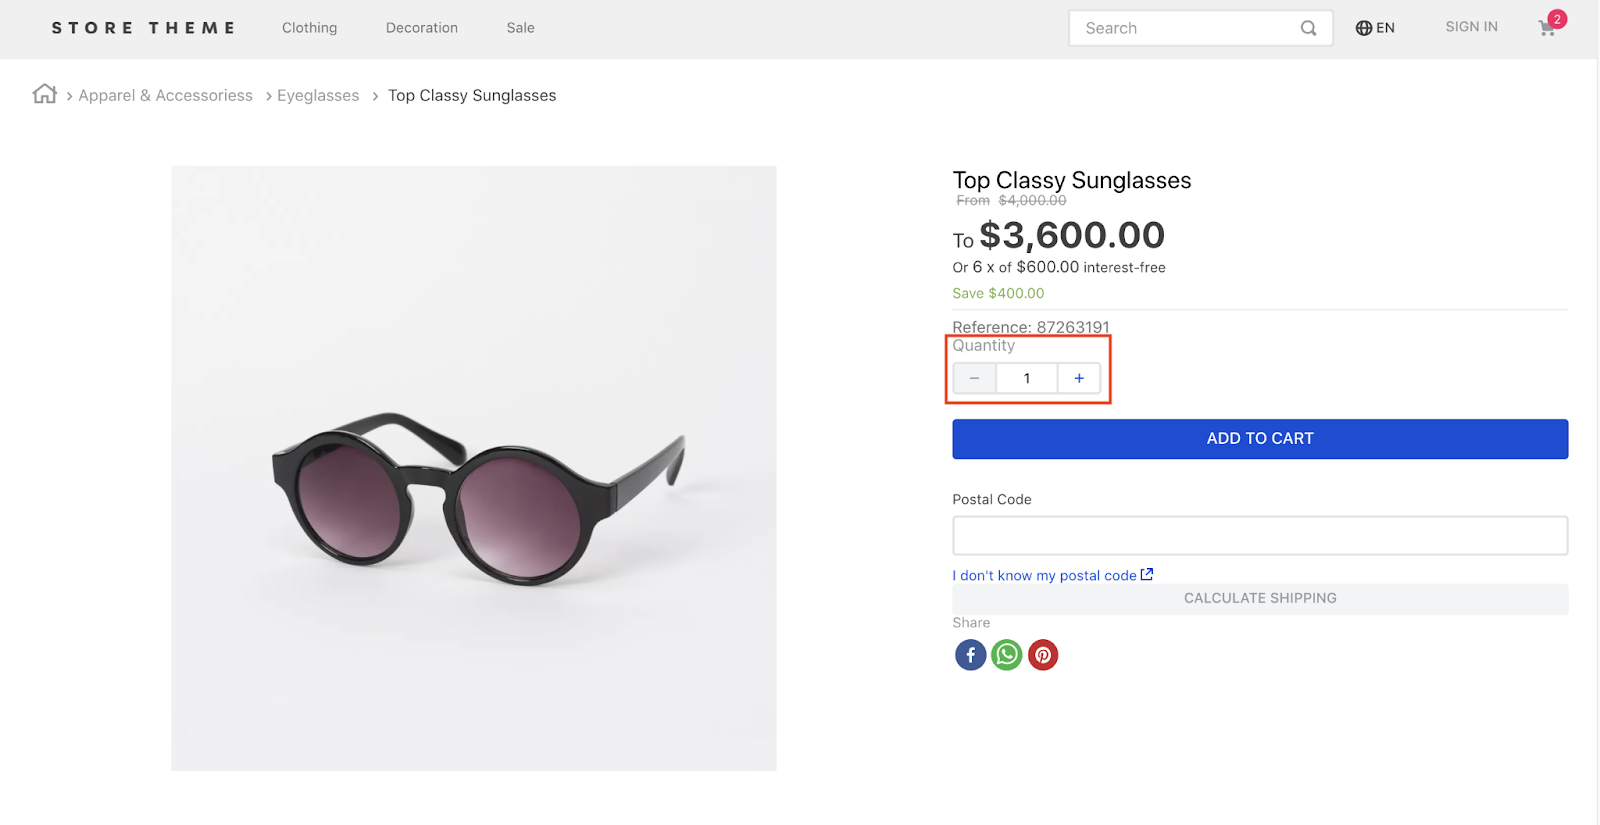
Product quantity is one such feature in the e-commerce world whereby your customers will select the quantity that they want to buy. Think of it as the digital version of grabbing three t-shirts off the rack instead of just one. On a Shopify product page, this typically appears as a quantity selector - an interactive element that includes "+" and "–" buttons, or sometimes a clean dropdown menu or input field, where customers can enter a number.
Let’s say a customer wants three dog toys or a bulk pack of mugs; instead of clicking “Add to Cart” multiple times (which can be extremely annoying), they simply adjust the quantity to what they need, then proceed smoothly to checkout.
It may seem like a small feature, but it’s big in terms of user experience and conversion rates.
How to enable Quantity Selector Box via Theme Settings (No Code Needed)
If you’d rather not mess with code, Shopify makes it super easy to add a Quantity Selector directly through the theme editor. This no-code method is perfect for store owners who want a quick and clean solution, no Liquid, no JavaScript, just point, click, and done.
Follow these simple steps to add a quantity box to your product page using Shopify’s built-in tools:
Step 1: Go to Your Shopify Admin Dashboard
-
From your Shopify admin, head to: Online Store → Themes
-
This is your primary command center for customizing the appearance and layout of your site.
Step 2: Open the Theme Customizer
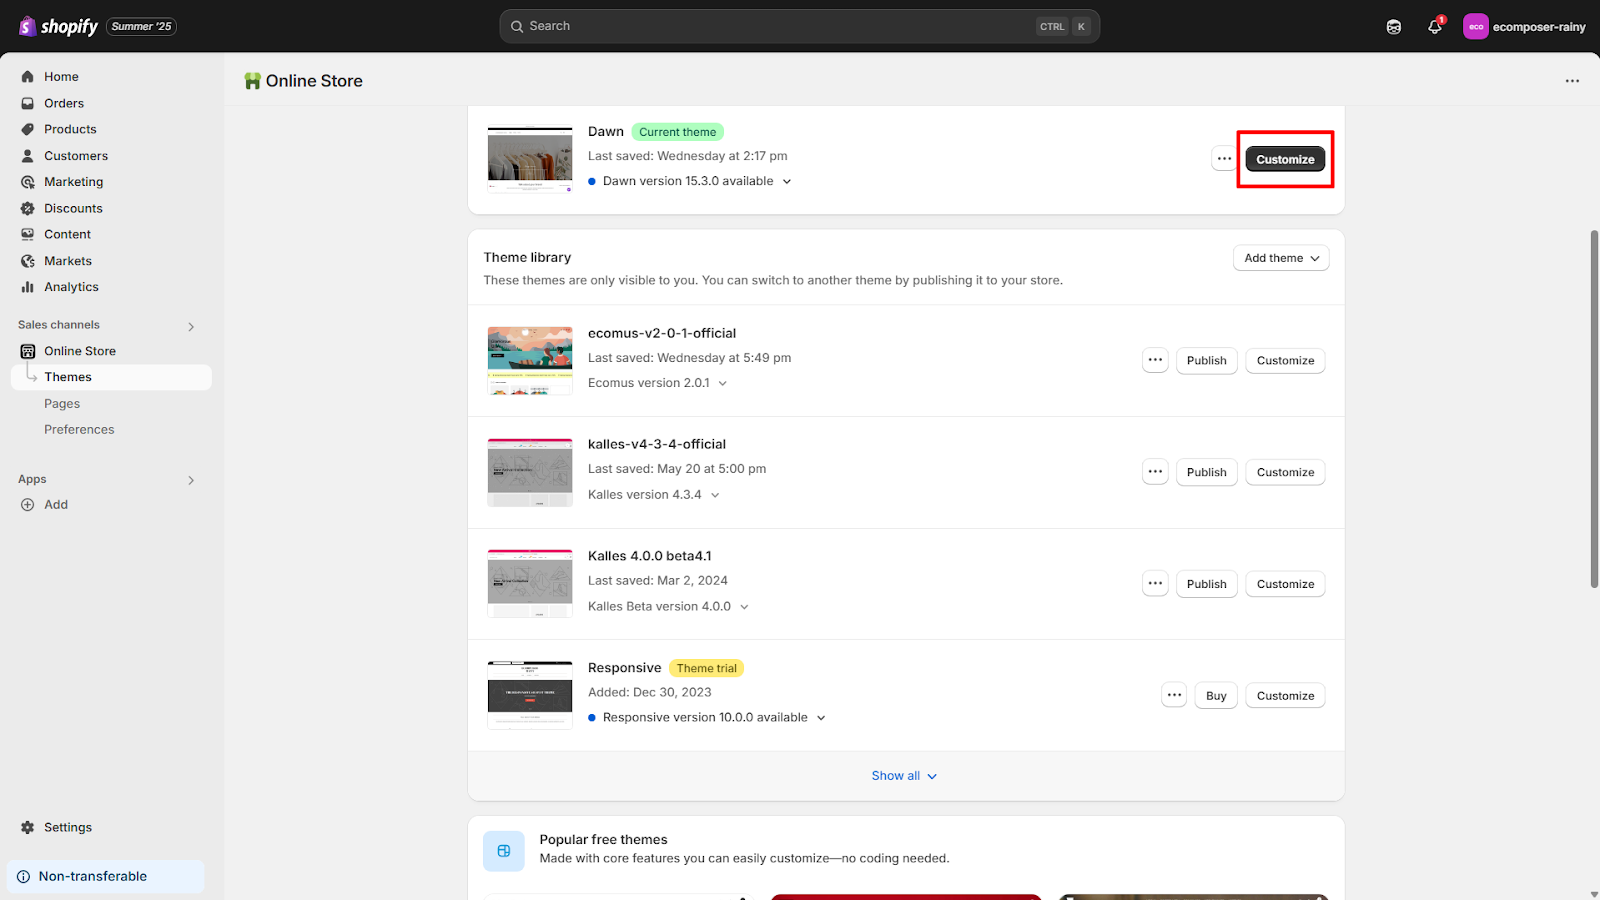
Find your live theme and click “Customize”. This opens Shopify’s visual theme editor, where all the magic happens, without needing to write a single line of code.
Step 3: Choose the Product Template
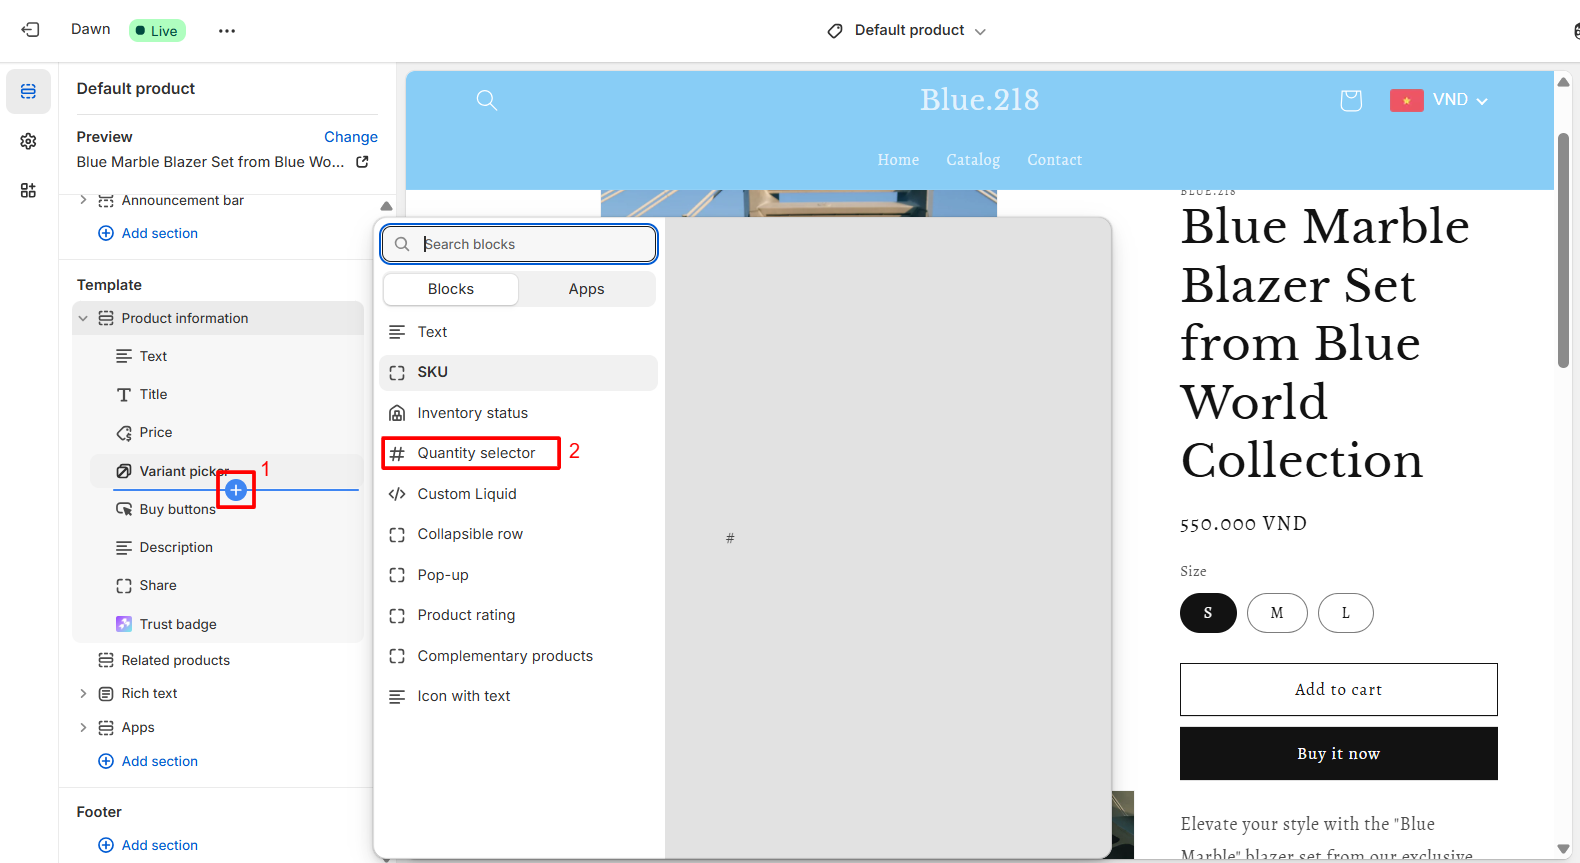
In the theme customizer, navigate to the product page template. If your theme supports multiple product templates (such as “Default Product” or “Featured Product”), select the one you want to edit. You’ll now see a live preview of your product page.
From here, scroll or click through the layout until you find the product form area - the section where customers choose variants, add to cart, and so on.
Step 4: Add the “Quantity Selector” Block
Now, click “Add Block” inside the product form section. In the list of available blocks, look for “Quantity selector” and add it. Drag and drop it to the spot where you want it to appear, typically right above or below the "Add to Cart" button.
Once added, hit “Save”, and you now have a working quantity selector on your product page!
How to add a manual Quantity Picker via Code (For the Brave and Curious)
Step 1: Duplicate your theme
This is like making a backup copy. If you make a mistake, you can simply delete the incorrect version and use your good copy instead.
-
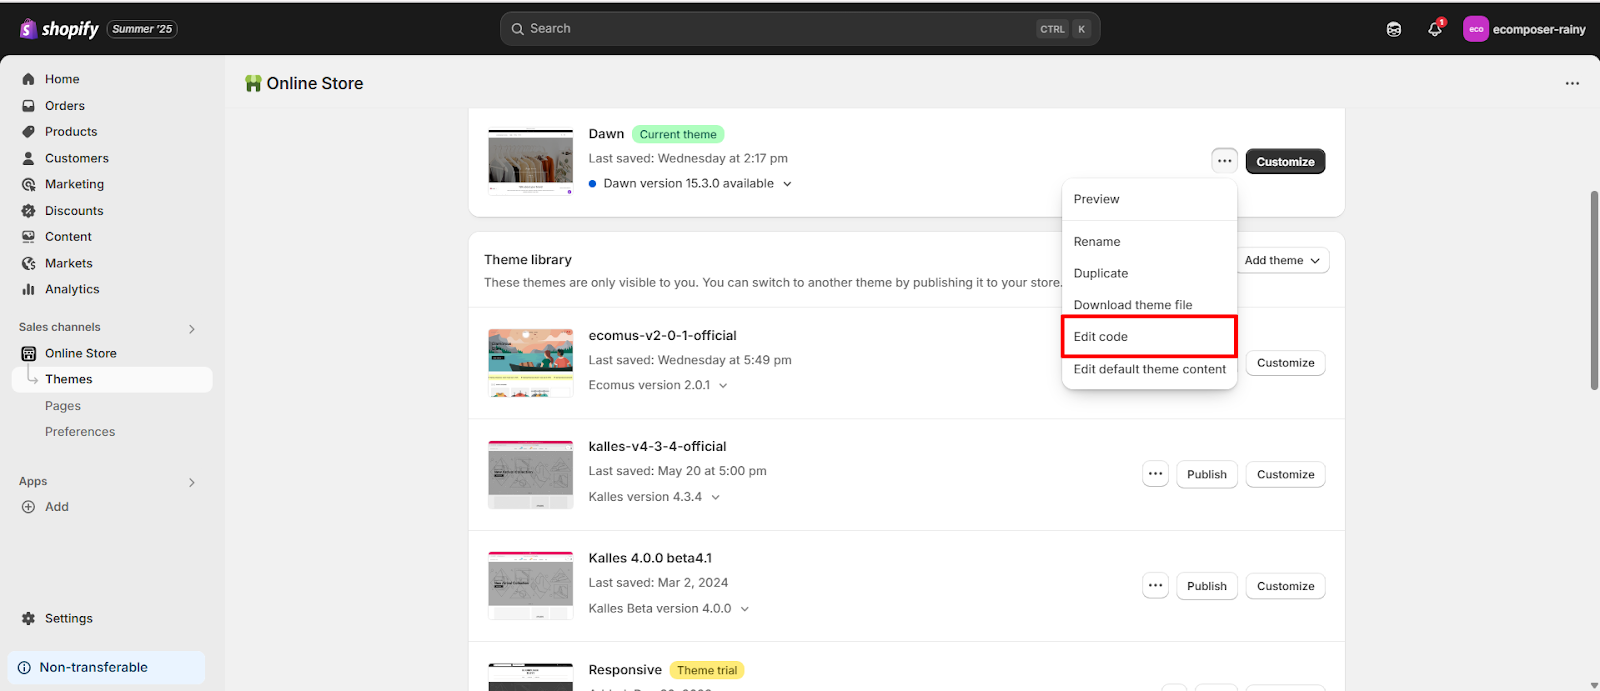
From your Shopify Admin, go to Online Store > Themes.
-
Find your current theme. Click Actions (the three dots next to the Customize button).
-
Select Duplicate.
Step 2: Access theme code:
-
From your Shopify Admin, go to Online Store > Themes.
-
Find the duplicated theme you just made.
-
Click Actions (the three dots).
-
Click Edit code.
Step 3: Find the right file:
On the left side, you'll see a list of folders and files. Look for the Sections folder. Inside the Sections folder, try to find a file named something like:
-
main-product.liquid
-
product-template.liquid
-
product-form.liquid
(If you can't find any of these, just pick main-product.liquid. It's the most common place.)
Then, click on that file name to open it in the code editor.
Step 4: Locate the "Add to Cart" button:
Now you're in the code. It looks like a lot of text, but don't panic, you need to find where the "Add to Cart" button is in this file. You can press Ctrl + F (or Cmd + F on Mac) to open a search bar, then type “add to cart” or “button type="submit"” into the search bar.
You're looking for something that looks like this (it might have more code around it):
<button type="submit" name="add" id="Add-to-Cart-Button-{{ section.id }}">
<span>Add to cart</span>
</button>
Or it might just be the <button> tag itself.
Step 5: Paste the quantity code:
-
You want to put the quantity box right before the "Add to cart" button.
-
Carefully place your cursor on the line just above the <button type="submit"...> line you found.
-
Paste the following code there:
<div class="product-form__quantity">
<label for="Quantity" class="form__label">Quantity:</label>
<input type="number"
id="Quantity"
name="quantity"
value="1"
min="1"
pattern="[0-9]*"
aria-label="Quantity"
class="quantity-input"
>
</div>
What this code does:
-
<div class="product-form__quantity">...</div>: This creates a box to hold your quantity selector.
-
<label for="Quantity"...>: This is the "Quantity:" text.
-
<input type="number" ...>: This is the actual box where customers type in a number.
-
name="quantity": This is super important! It tells Shopify "this is the quantity."
-
value="1": The starting quantity will be 1.
-
min="1": Customers can't choose less than 1.
Step 6: Save the file and preview your changes
-
In the code editor's upper right corner, click the Save button.
-
Go back to the Themes page in your Shopify Admin.
-
Find your duplicated theme.
-
Click Actions (the three dots) and then Preview.
-
Go to a product page. You should now see a simple quantity box above your "Add to Cart" button!
Step 7: Publish (if it works)
If you're happy with how it looks and functions on the preview, you can make this duplicated theme your live theme.
-
Go back to Online Store > Themes.
-
Find your duplicated theme.
-
Click Actions and then Publish. Confirm the action.
How to add Quantity to Your Shopify Product Page using Shopify Third-party Apps
You can add this functionality to your Shopify store using a third-party app instead of theme settings and code to add the Value of the Quantity to the Product page. Some apps you can refer to are EComposer Landing Page Builder, Extendons Quantity Selector, Minmaxify Order Limits, Bundler ‑ Product Bundles, Quantity Selector Plus, etc…
Here is how to add Quantity to your Shopify Product Page using Shopify Third-party Apps, for example, with EComposer.
Step 1: Add the Quantity Element
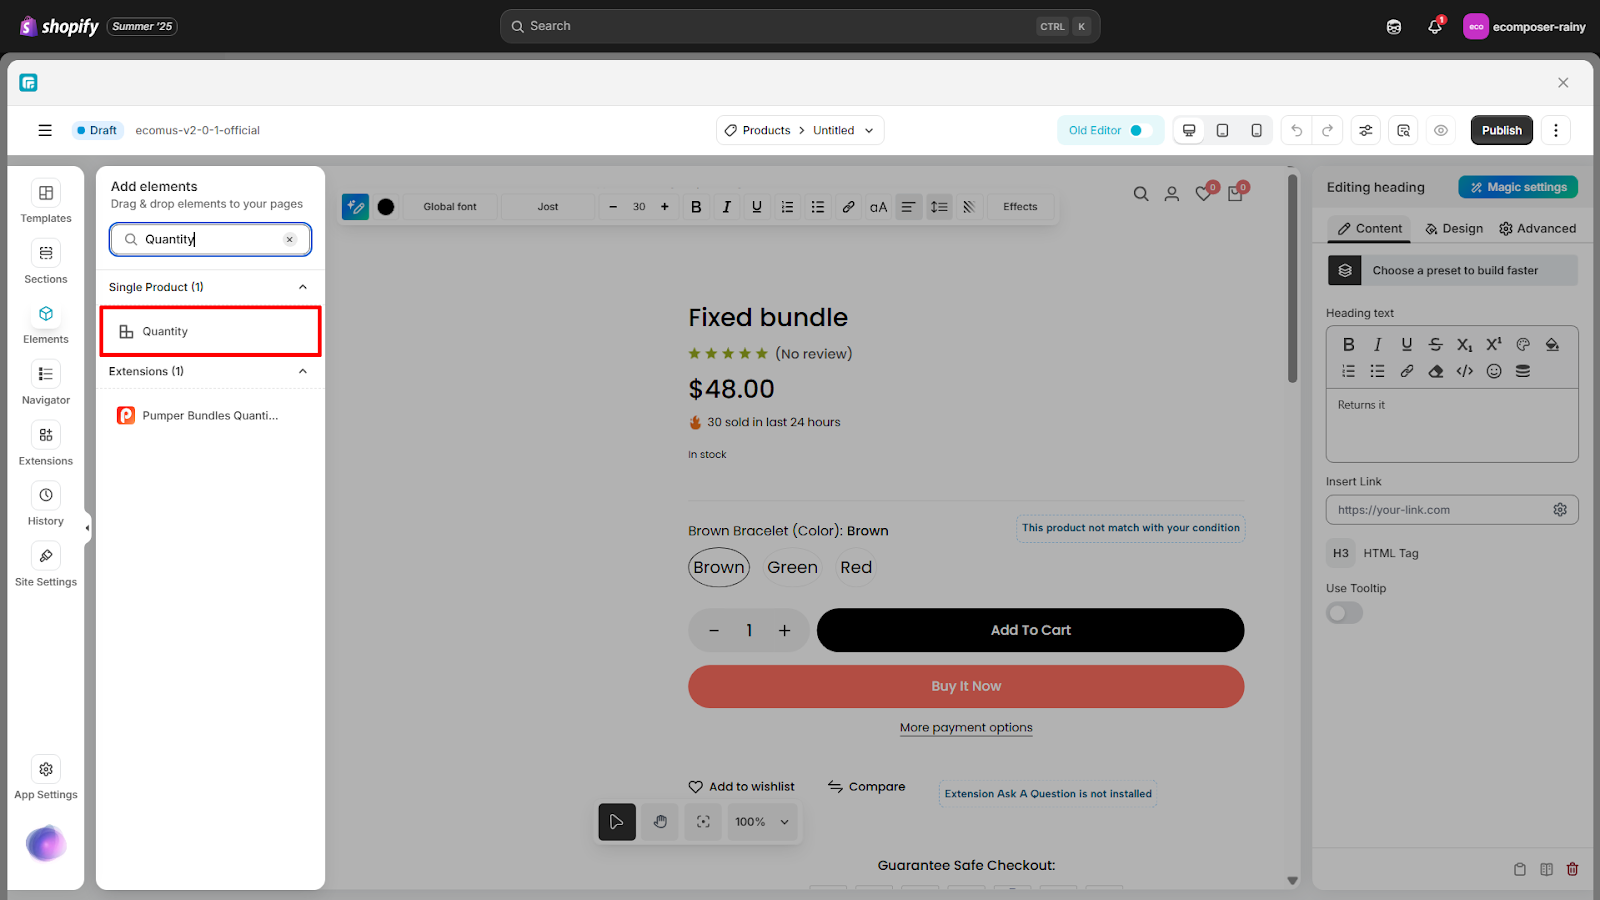
Once you’ve installed EComposer and opened the product page builder, navigate to the Single Product tab. From there, simply drag and drop the "Quantity" element into your desired position on the page. Want it above the “Add to Cart” button? Below the variant picker? You’ve got total freedom.
Step 2: Configure the Element
After dropping the quantity selector into place, it’s time to make it yours. EComposer offers two tabs, Content and Design, to fine-tune every detail.
Content Settings
-
Quantity Type: Choose between an “Input box” (users type the number) or a “Dropdown” menu.
-
Title: Add a label like “Quantity” above the selector to guide customers.
-
Plus/Minus Icons: Customize these buttons to match your store’s vibe—choose your preferred icon styles.
-
Quantity Limits: Enable minimum and maximum quantities to control the number of items shoppers can add (great for bulk rules or inventory management).
-
Layout: Choose “Vertical” or “Horizontal” alignment for your label and selector.
-
Spacing & Alignment: Adjust the space around the element and align it left, center, or right as needed.
Design Settings
Want the quantity selector to match your brand’s aesthetic down to the pixel? The Design tab has you covered:
-
General Settings: Adjust element height, padding, and responsive behavior.
-
Title Styling: Set typography, text color, alignment, text shadow, and spacing between label and selector.
-
Quantity Input: Adjust the input width for improved usability, especially on mobile devices.
-
Plus/Minus Buttons:
-
Set size and rotation for each device (desktop, tablet, mobile).
-
Add hover effects, such as background color, border radius, animations, and even transition durations, for a smooth, interactive feel.
How to optimize the Quantity Selector for conversions

A quantity selector may seem like a small detail, but it plays a surprisingly powerful role in influencing purchasing behavior. When implemented thoughtfully, it can reduce friction, improve accessibility, and even drive larger order values. Here's how to make your quantity selector work harder for your business:
Strategic Placement
The location of your quantity selector should follow a simple rule: keep it close to where action happens, specifically, the “Add to Cart” button. This proximity creates a smoother buying experience by reducing the number of clicks or scrolls needed to complete an action.
To determine the best placement:
-
Use A/B testing tools (like Google Optimize or Shopify apps) to compare positions - above, below, or beside the Add to Cart button.
-
Monitor heatmaps (via Hotjar or Lucky Orange) to see where customers are focusing their attention.
Remember: If users have to search for it, they probably won’t use it.
Visual Design That Drives Action
Design should never be an afterthought. To optimize its performance, your quantity selector should be:
-
Bold and easy to read, with fonts that stand out on your theme background.
-
Tappable and responsive, especially on mobile devices.
-
Aligned with WCAG accessibility standards, ensuring strong contrast between text/buttons and background.
Also, use recognizable “+” and “–” icons instead of plain numbers; they’re more intuitive and boost usability.
Upselling Opportunities
Your quantity selector can encourage larger purchases when paired with promotional logic. For example:
-
“Buy 3, Get 10% Off” messages are triggered when users select three or more items.
-
Bundled offers or free shipping thresholds (“Add 1 more for free shipping!”).
Apps like EComposer or Bundler make this easy to implement without coding.
Track Usage with Analytics
Use Shopify Analytics or Google Analytics (with Enhanced Ecommerce enabled) to track:
-
How often do users change quantity
-
Conversion rates related to quantity selections
-
Average quantity per order
This data helps you fine-tune pricing, discount thresholds, and product strategies based on real shopper behavior.
Troubleshooting Tips for Adding Quantities to Your Shopify Product Page
So, you've added a quantity selector—but something’s not quite right? Don’t worry. Even the most well-meaning customization can run into a hiccup or two. Whether your selector isn’t showing up, displaying weirdly, or misbehaving on mobile, this section will guide you through the most common issues and how to fix them.
Quantity Selector Not Displaying
Issue: You’ve added the quantity selector through your theme settings or manually inserted the code, but it’s nowhere to be found on the live product page.
Possible Causes & Fixes:
-
Theme compatibility: Some Shopify themes, especially older ones or those not built on Online Store 2.0, may not support dynamic blocks like the quantity selector. Please refer to the documentation or get help from the theme developer if you're using a third-party theme.
-
Code placement error: If you’ve added the selector manually via Liquid, double-check that it’s placed within the correct section of your theme (typically inside the product-form.liquid or main-product.liquid file).
-
JavaScript conflicts: Other apps or custom scripts may interfere with the selector’s function. Use your browser console (right-click → Inspect → Console tab) to check for script errors.
Incorrect Inventory Display
Issue: The quantity box appears, but it shows incorrect inventory info, or allows shoppers to select more items than you have in stock.
Possible Causes & Fixes:
-
Inventory tracking not enabled: Go to Shopify Admin → Products → [Your Product] and ensure “Track quantity” is checked.
-
Variant mismatch: If your product has variants, make sure inventory is set correctly for each variant. Sometimes, only the default variant is updated.
-
Missing dynamic Liquid code: The correct snippet to pull real-time inventory is:
{{ product.selected_or_first_available_variant.inventory_quantity }}
If this isn’t present, inventory data won’t update dynamically.
Mobile Display Issues
Issue: The quantity selector looks great on desktop, but it’s either squished, overlapping, or disappearing entirely on mobile.
Possible Causes & Fixes:
-
Lack of responsive CSS: Some themes may not apply responsive styles to custom elements. Inspect your code and ensure width, padding, and alignment adjust properly using media queries.
-
Custom apps not optimized for mobile: If you're using a third-party app (like EComposer), check the mobile layout in the app’s preview mode and tweak alignment, spacing, or font size.
-
Test thoroughly: Always preview changes on both desktop and mobile using the Shopify customizer, and don’t forget to test on multiple devices if possible.
When in Doubt: Get Help
If you’ve tried everything and the quantity selector still isn’t behaving, don’t hesitate to:
-
Contact Shopify Support, and they can check theme behavior and backend conflicts.
-
Reach out to your theme or app developer, especially helpful if you’re using a custom or premium theme.
-
Hire a Shopify Expert. For more complex issues or advanced customization, a developer familiar with Shopify Liquid and JavaScript can save you hours (and headaches).
Frequently Asked Questions
1. Is “Out of Stock” a Marketing Strategy?
Surprisingly, yes, it can be.
When used wisely, showing an item as “Out of Stock” can create urgency and increase demand. Shoppers tend to view sold-out products as more desirable, especially when there's a message like “Back in stock soon!” or “This item sells out fast.” However, use this tactic sparingly. Overdoing it can frustrate customers and lead to lost trust.
Pro tip: If you're using scarcity as part of your strategy, consider adding real-time stock indicators (e.g., “Only 3 left in stock”) rather than removing product availability altogether.
2. How Does Shopify Handle Out-of-Stock Products?
By default, Shopify hides the “Add to Cart” button when a product is out of stock, if inventory tracking is enabled and backorders are not allowed.
You can find these settings under:
Shopify Admin → Products → [Your Product] → Inventory
You have three main options:
-
Continue selling when out of stock (great for pre-orders or made-to-order items)
-
Hide out-of-stock variants automatically
-
Show inventory messages like “Sold Out” or “Restocking Soon”
Using Shopify Liquid, you can even create custom logic to display alerts or request emails for restock notifications.
3. Can I Limit How Many Items Someone Can Buy?
Absolutely. You can set minimum and maximum quantities either:
-
Through theme customization (with code)
-
By using third-party Shopify apps like Order Limits, MinMaxify, or EComposer’s quantity control
Limiting quantity is useful for:
-
Preventing bulk purchases of limited items
-
Encouraging fair access to flash sales
-
Managing inventory more evenly across customers
This is especially common in health, fashion, and collectible niches.
4. Can I Add Quantity Selectors to the Cart Page?
Yes, and it’s actually a great idea.
Adding quantity selectors on the cart page gives customers one last chance to modify their order, without navigating back to the product page. This improves the user experience and increases the chance of larger purchases.
Most themes support cart page quantity controls by default. If not, you can add them using a small amount of Liquid code in cart.liquid or main-cart-items.liquid, depending on your theme.
Look for this snippet:
<input type="number" name="updates[]" value="{{ item.quantity }}" min="1">
For enhanced cart behavior, consider using Ajax cart apps or slide-out drawer carts.
5. Will Adding a Quantity Selector Affect Page Loading Speed?
In most cases, not significantly.
A basic quantity selector (via theme settings or simple code) adds minimal load time. However, using JavaScript-heavy apps or poorly optimized plugins may slightly impact performance, especially on mobile.
To ensure speed isn’t affected:
-
Use lazy loading for JavaScript
-
Minify CSS/JS files
-
Choose lightweight apps that are Shopify-approved
You can test your performance anytime using Google PageSpeed Insights or Shopify’s built-in speed report.
Final Thought
Quantity addition to Shopify product page elements is one of the easy but effective means to improve the shopping experience in your stores. Depending on how you like to work whether using the theme customizer, adopting some custom code, or using powerful apps, the quantity selector can be customised to suit your brand and customer requirements. At its best, it will not only make it easier to use but may also attract larger purchases. Begin to optimise this feature now to increase your visitor interactions and conversion levels on your shopify store.
Read more:
Still stuck? How can we help?
Table of content


Related posts

Easy Steps To Add Trust Badges to Your Shopify Product Page

ReConvert Shopify App Review: Features, Pricing Comparison
Simple Guide to Limit Purchase Quantity Per Customer On Shopify
How to Add a Free Gift to Your Shopify Store- 2025 Ultimate Guide
How to Add a Shopify Thank You Page Upsell to Boost AOV After Checkout
